不同格式数据集的转换——“图形码检测”项目笔记

三大类型:COCO,VOC,YOLO

COCO

  • COCO数据集现在有3种标注类型,分别是:
    • object instances(目标实例)
    • object keypoints(目标上的关键点)
    • image captions(看图说话)
  • 这3种类型共享这些基本类型:info、image、license,使用JSON文件存储。

以 object instances 为例,COCO 格式将会如此进行标注:

1
2
3
4
5
6
7
8
9
10
11
12
13
14
15
16
17
18
19
20
21
22
23
24
25
26
27
28
29
30
31
32
33
34
35
36
37
38
39
40
41
42
43
44
{
"info": info, # dict
"licenses": [license], # list,内部是dict
"images": [image], # list,内部是dict
"annotations": [annotation],# list,内部是dict
"categories": [category] # list,内部是dict
}

info{ # 数据集信息描述
"year": int, # 数据集年份
"version": str, # 数据集版本
"description": str, # 数据集描述
"contributor": str, # 数据集提供者
"url": str, # 数据集下载链接
"date_created": datetime, # 数据集创建日期
}
license{
"id": int,
"name": str,
"url": str,
}
image{ # images是一个list,存放所有图片(dict)信息。image是一个dict,存放单张图片信息
"id": int, # 图片的ID编号(每张图片ID唯一)
"width": int, # 图片宽
"height": int, # 图片高
"file_name": str, # 图片名字
"license": int, # 协议
"flickr_url": str, # flickr链接地址
"coco_url": str, # 网络连接地址
"date_captured": datetime, # 数据集获取日期
}
annotation{ # annotations是一个list,存放所有标注(dict)信息。annotation是一个dict,存放单个目标标注信息。
"id": int, # 目标对象ID(每个对象ID唯一),每张图片可能有多个目标
"image_id": int, # 对应图片ID
"category_id": int, # 对应类别ID,与categories中的ID对应
"segmentation": RLE or [polygon], # 实例分割,对象的边界点坐标[x1,y1,x2,y2,....,xn,yn]
"area": float, # 对象区域面积
"bbox": [xmin,ymin,width,height], # 目标检测,对象定位边框[x,y,w,h]
}
categories{ # 类别描述
"id": int, # 类别对应的ID
"name": str, # 类别名字
"supercategory": str, # 主类别名字
}

VOC

  • VOC 类数据集由以下 5 个部分构成
    • JPEGImages: 存放的是训练与测试的所有图片。
    • Annotations: 里面存放的是每张图片打完标签所对应的 XML 文件。
    • ImageSets: ImageSets 文件夹下本次讨论的只有 Main 文件夹,此文件夹中存放的主要又有四个文本文件test.txttrain.txttrainval.txtval.txt, 其中分别存放的是测试集图片的文件名、训练集图片的文件名、训练验证集图片的文件名、验证集图片的文件名。
    • SegmentationClass/SegmentationObject: 存放的都是图片,且都是图像分割结果图,对目标检测任务来说没有用
    • ObjectSegmentation: 标注出每一个像素属于哪一个物体。

An example:

1
2
3
4
5
6
7
8
9
10
11
12
13
14
15
16
17
18
19
20
21
22
23
24
25
26
<annotation>
<folder>pdf417</folder> # 图片所处文件夹
<filename>7758258.jpg</filename> # 图片名
<path>~/data/images/pdf417/7758258.jpg</path>
<source> #图片来源相关信息
<database>Unknown</database>
</source>
<size> #图片尺寸
<width>640</width>
<height>480</height>
<depth>3</depth>
</size>
<segmented>0</segmented> #是否有分割label
<object> 包含的物体
<name>pdf417</name> #物体类别
<pose>Unspecified</pose> #物体的姿态
<truncated>0</truncated> #物体是否被部分遮挡(大于15%)
<difficult>0</difficult> #是否为难以辨识的物体, 主要指要结体背景才能判断出类别的物体。虽有标注, 但一般忽略这类物体
<bndbox> #物体的bound box
<xmin>2</xmin> #左
<ymin>156</ymin> #上
<xmax>111</xmax> #右
<ymax>259</ymax> #下
</bndbox>
</object>
</annotation>

YOLO

  • 使用 TXT 文件进行保存,对每个图片编写一个同名文本文件

假设对于图片 7758258.jpg,在同目录下创建 7758258.txt:

1
<object-class> <x> <y> <width> <height>

如何转换?

首先我们关注到 COCO 是对整个数据集建立 JSON 文件,而 VOC 和 YOLO 都是对单张图片建立文件。

  1. 关于从 COCO 数据集中读写数据(JSON I/O)
1
2
3
4
5
6
7
8
9
10
11
12
13
14
15
16
17
18
19
20
21
22
23
24
25
26
27
28
29
30
31
32
33
34
35
36
37
38
39
40
41
42
43
# 读操作
from pycocotools.coco import COCO # 这个库支持原本比较复杂的JSON读取操作

def load_coco(file_path, xml_save_path):
coco = COCO(file_path)

classes = dict()
for cat in coco.dataset['categories']:
classes[cat['id']] = cat['name']
imgIds = coco.getImgIds()
classesIds = coco.getCatIds()

for imgId in tqdm(imgIds): # JSON 每进一步,用循环来加载所有属性
size = {}
img = coco.loadImgs(imgId)[0]
filename = img['file_name']
width = img['width']
height = img['height']
size['width'] = width
size['height'] = height
annIds = coco.getAnnIds(imgIds=img['id'], iscrowd=None)
anns = coco.loadAnns(annIds)

objs = []
for ann in anns:
# obj = ...
objs.append(obj)

# 如果转为 VOC,YOLO,则在每个 image 加载后进行一次 XML/TXT 文件构造,如:
save_anno_to_xml(filename, size, objs, xml_save_path)

# 写操作
import json

coco = dict()
coco['images'] = []
coco['type'] = 'instances'
coco['annotations'] = []
coco['categories'] = []

def save_coco(data_dir, json_save_path):
# prepare data
json.dump(coco, open(json_save_path, 'w'))
  1. 关于从 VOC 数据集中读写数据 (XML I/O)
1
2
3
4
5
6
7
8
9
10
11
12
13
14
15
16
17
18
19
20
21
22
23
24
25
26
27
28
29
30
31
32
33
34
35
36
37
38
39
40
41
42
43
44
45
46
47
48
49
50
51
52
53
54
55
56
57
58
59
60
61
62
63
64
65
66
# 读操作
from lxml import etree, objectify # 使用这个库可以更方便地解析 XML 文件
def load_xml(xml):
"""
将xml文件解析成字典形式,参考tensorflow的recursive_parse_xml_to_dict
Args:
xml: xml tree obtained by parsing XML file contents using lxml.etree

Returns:
Python dictionary holding XML contents.
"""
if len(xml) == 0: # 遍历到底层,直接返回tag对应的信息
return {xml.tag: xml.text}

result = {}
for child in xml:
child_result = parse_xml_to_dict(child) # 递归遍历标签信息
if child.tag != 'object':
result[child.tag] = child_result[child.tag]
else:
if child.tag not in result: # 因为object可能有多个,所以需要放入列表里
result[child.tag] = []
result[child.tag].append(child_result[child.tag])
return {xml.tag: result}

# 写操作
def save_xml(filename, size, objs, save_path):
"""
filename: 图片文件名
size: 图片尺寸,格式为 (height, width, depth)
objs: 包含所有目标的列表,每个目标是一个字典,包含 'name' 和 'bbox' 键
xml_save_path: 保存 XML 文件的路径
"""
E = objectify.ElementMaker(annotate=False)
anno_tree = E.annotation(
E.folder("DATA"),
E.filename(filename),
E.source(
E.database("The VOC Database"),
E.annotation("PASCAL VOC"),
E.image("flickr")
),
E.size(
E.width(size[1]),
E.height(size[0]),
E.depth(size[2])
),
E.segmented(0)
)
for obj in objs:
anno_tree.append(
E.object(
E.name(obj['name']),
E.pose("Unspecified"),
E.truncated(0),
E.difficult(0),
E.bndbox(
E.xmin(obj['bbox'][0]),
E.ymin(obj['bbox'][1]),
E.xmax(obj['bbox'][2]),
E.ymax(obj['bbox'][3])
)
)
)
anno_path = os.path.join(save_path, filename[:-3] + "xml")
etree.ElementTree(anno_tree).write(anno_path, pretty_print=True)
  1. 关于从 YOLO 数据集中读写数据 (TXT I/O)

YOLO 的数据集转换相对简单,因此代码略过。

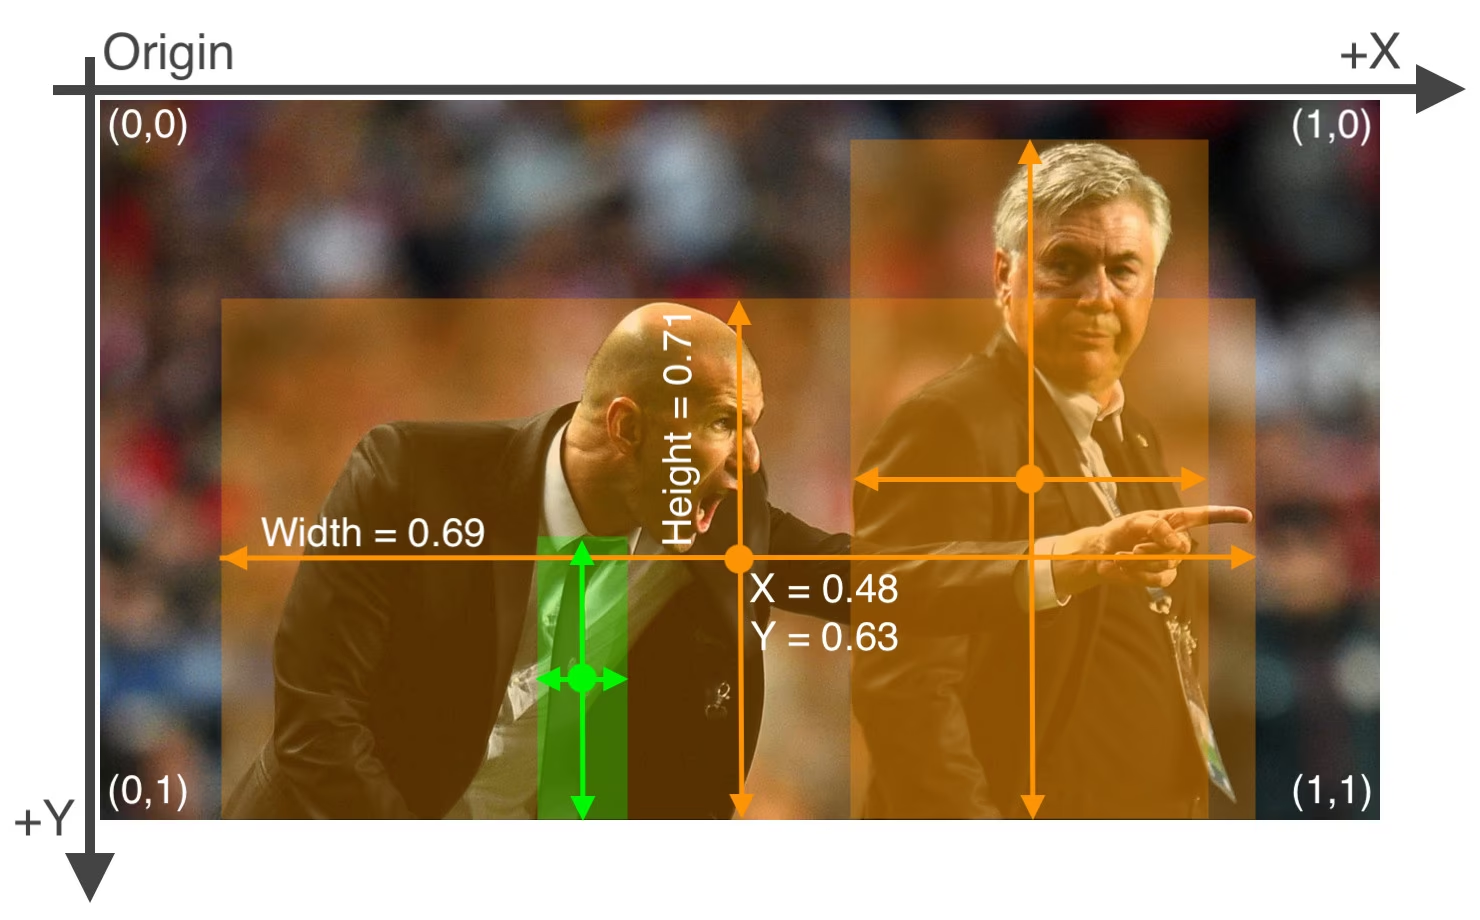
但是值得注意的是 YOLO 的格式是相对简单的文本格式,每一行代表一个目标,格式如下:

<object-class> 是目标的类别,<x><y> 是目标中心点的坐标,<width><height> 是目标的宽度和高度,所有值都是相对于图片宽高的比例(0到1之间的小数)。

关于我们所需的 YuNet 数据集格式说明

为了适应 YuNet 用于训练人脸检测任务的训练脚本,我们需要把数据集转为另一种格式存储,格式如下:

1
2
# <image_path> <width> <height> <obj_class>
<x1> <y1> <x2> <y2>
  • 目前尚未完成:
    • ✅ 将人脸检测中所用的“关键点”数据删除(因此可以看到目标坐标数据后有 3 个关键点数据)
    • ❌ 目标类型目前作为图片属性而不是目标属性,因此只支持单图单目标训练(但因为这样训练出的模型也支持多目标多类检测,因此不打算修改)
------------- 本文结束 感谢阅读 -------------